

Much like the levain I currently have stowed away in the fridge, my recipe for making sourdough requires maintenance. Maybe not constant, but I often find myself tweaking my formula as time goes on. Sometimes it's when I’m scrolling through social media and see a new technique that piques my interest. Other (unfortunate) times it’s when I find myself staring at a pathetic excuse for a loaf of bread- spread, tight crumb, bland, burnt, and just plain sad. But then you just get it one day. The day you make a loaf, and you can’t wait to show the world and say, “Look what I made!” And then you make it again... and it’s all back to being meh. You know what they say: two steps forward, one step back. At the very least, it will always be edible.
In case you haven’t guessed it yet, this is not and will never be my final formula. Bread, especially sourdough, is not a stagnate process (in more ways than one). It’s not a coincidence the act of bread baking is comparable to predicting the weather. With caring for and feeding your starter, it’s much more of a living entity than just the bookends of a sandwich. But don’t let this intimidate you! The satisfaction of not only making your own loaf but know just how you did it and how to recreate it, again and again, is more than worth it in the end.
That being said, here is how I (currently) make naturally leavened sourdough bread:
1. Sourdough Starter (100% hydration)

They say it's bad luck to not name your starter, so meet Link! Yes, I named him after the Legend of Zelda, and yes, he is the hero of bread. But what can I say, they’re great games and I can’t resist a good pun either (get it, because the starter links together each loaf… I’ll stop now). You’ll want to follow your typical procedure for feeding your starter to get it bubbly and active. This formula requires a starter that is at 100% hydration. I’d recommend feeding your starter the day before baking and let it rise at room temperature for 6 hours. It should double in size. Mark the height on the container with a dry erase marker or rubber band and place it in the back of your refrigerator overnight. The next day, you may see that its height decreased a bit overnight- that is ok! Leave it out at room temp and continue to step 2 immediately (try to do this first thing in the morning too!).
2. Autolyse (mix and rest)

Though it may test your patience, this step helps to produce a super-extensible dough and improved flavor with very little work. Simply mix together the water and flours (do not include the starter, malt, or salt) until the flour is completely hydrated. Clean the sides of the bowl to the best of your ability and cover with plastic, or in my case, a shower cap. Let this rest for approx. 2 hours at room temperature. In the meantime, your starter should come at room temperature as well. It may even rise more than the day before, near triple the original height post-feeding.
3. Adding the levain (starter) and malt

After 2 hours, add the malt powder and starter to the dough. It helps to first sprinkle in the malt, then spread the liquid sourdough starter across the dough with wet hands before working it in. Because both are so high in hydration, it should incorporate fairly easily. I find it's best to do a scooping motion rather than typical kneading. Keep working at it until the dough is uniform. Cover again and rest for 30-45 minutes.
4. Adding the salt

Sprinkle the salt over the top of the dough. With wet hands, dimple it into the dough. Grab the dough and once again with the scooping motion, fold the dough underneath itself. Continue doing this to work the salt into the dough, kneading for about 5 minutes. It is important to ensure it is thoroughly incorporated. If not, the salt will tighten the gluten and possibly make very dense pockets of dough. This is why folding it under is important, as it prevents making a dense bundle of salt and gluten in the center. Gently round the dough and cover the bowl, resting for another 30-45 minutes. It is important to note that you should be using non-iodized salt! Kosher or sea salt is best.
5. Fold

To begin building strength, give the bread a fold. This can be done on the countertop (floured if you find it is sticking) or inside the bowl. The dough should be very slack at this stage. This does not have to be a full coil fold, but just get the dough moving. Cover the bowl and rest for 30 minutes. (Peep the cinnamon rolls in the background!)
6. Laminate


This helps to build a lot of strength early on in the fermentation of the dough. Remove the dough from the bowl and place it on the counter. I find that the dough does not stick on my wooden board. But depending on what your surface is made out of; you may need flour or even water to prevent the dough from sticking. Using both hands, stretch the dough into a large rectangle. Do this by always pulling from the center and stretching outwards. Repeat several times until you have a thin sheet of dough. Grab one side fold it into the center, repeat the other so the three layers are overlapping (like when folding a letter). Fold the bottom into the center, followed by the top to make a small bundle. Transfer the dough to a new, clean container with a flat bottom, cover, and rest for 1 hour.
7. Stretch and folds

After resting one hour, perform a coil fold to build more strength in the gluten. With wet hands scoop the dough from both sides stretch the dough upwards and fold the dough onto itself on the top and bottom. Turn the bowl and repeat. When doing this, try to give the dough a pretty significant stretch to help get the most out of each fold. Ensure the dough is smooth side up and cover once again. Let it rest for 1 hour and perform 3 more coil folds with an hour rest after each (for a total of 4). The dough should stretch and cover the bottom of the container after resting each hour, though you will gradually spread less and less as strength is built.
8. Preshaping the dough

Turn out the dough onto a lightly floured surface. Turnover and round the dough with your hands. Do this by cupping both and placing them on the farthest side of the dough. Dragging your hands along the table, bring the dough towards you, tucking in and creating slight surface tension. This should just be a gentle rounding; the dough should not be too tight. Place your original bowl upside-down over the dough (to prevent it from drying out) and let it rest for 30 minutes. In the meantime, flour your oval banneton (mine is 10 x 6 x 3.5”) or other desired proofing basket. I only use bread flour, but if you find that yours is prone to sticking, use rice flour instead
9. Shaping


Lightly flour the work surface again. Take your dough and flip it over so it is smooth side down and lightly stretch into an oval. Stich together both sides by pinching the dough so they meet in the center. Begin folding the top-down, pushing the dough back with your thumbs to make surface tension. Continue doing so until you reach the end of the dough, then use your palm to seal the edge together. Stich both sides of the dough to seal. Using the same technique when rounding, create more surface tension in the dough if you deem it necessary. Transfer to your prepared banneton, cover (again, this is where a shower cap really comes in handy).
10. Proofing and retarding your dough
Due to having such a long bulk fermentation, this dough only gets a short proof of about 15 to 20 minutes at room temp. After, transfer your dough to the fridge to retard overnight. Once again, this helps to produce a great flavor, though it may create blisters on the crust.
11. Scoring the dough

This. This right here is the bane of my existence. Trevor Jay Wilson, author of Open Crumb Mastery, shared this video on his Instagram executing the perfect way to score your batard. You'll want to do this with the dough right out of the fridge just before baking. The idea is to do one long, swift motion from top to bottom, holding your lame at a 90-degree angle. I still find myself struggling the most with this, but it is vital to getting a more open crumb out of your loaf as it creates an opening for the steam to escape. Practice makes perfect, and perhaps I should not be as stubborn with using my somewhat dull blade and finally get a new one. Feel free to create any decorative cuts as well.
12. Baking

Preheat your dutch oven or bread cloche for 30 minutes prior to baking at 500 F. Add the scored bread to the oven, cover with the lid, and bake for 20 minutes. After, remove the lid, reduce the heat to 450 F, and bake for 20 more minutes. You’ll know the bread is done when it sounds hollow after knocking on the bottom. You may be baking the bread darker than you are used to. The crust is where the flavor comes in, so you certainly shouldn’t blond bake your sourdough! Let cool for at least 1 hour before cutting.
Naturally Leavened Sourdough
Yeild: 1 loaf

The addition of the starter brings this formula to approx 77.5% hydration
Omit the malt if you do not have any, and substitute the spelt with more whole wheat if needed.
Mix together the flours and water until completely hydrated. Cover and set aside for 2 hours to autolyse.
Add the malt and liquid sourdough starter, mixing until thoroughly combined. Cover and rest for 30-45 minutes.
Add the salt and work it into the dough until you no longer feel any granules. Cover and rest for 30-45 minutes.
Fold the dough, cover, and rest for 30 minutes.
Laminate by stretching the dough to make a flat sheet and folding like a letter. Transfer it to a new container and rest for 1 hour.
Perform a coil fold ---> rest 1 hour ---> coil fold ---> rest 1 hour ---> coil fold ---> rest 1 hour ---> coil fold ---> rest 1 hour (for a total of 4 folds).
Preshape your dough by rounding, rest for 30 minutes.
Shape the dough by stitching and folding to create a taught batard, transfer it to a floured banneton, and cover.
Proof for 15-20 minutes and transfer to the fridge to cold ferment/retard overnight
Preheat your dutch oven for 30 minutes at 500 F prior to baking. Score the dough right out of the fridge with one long slash. Optional: add decorative cuts as well.
Bake covered for 20 minutes at 500 F. Reduce the heat to 450, remove the lid and bake for 20 more minutes.
Cool on a wire rack for approx 1 hour before cutting.
Now, let’s pick apart the loaf I made!

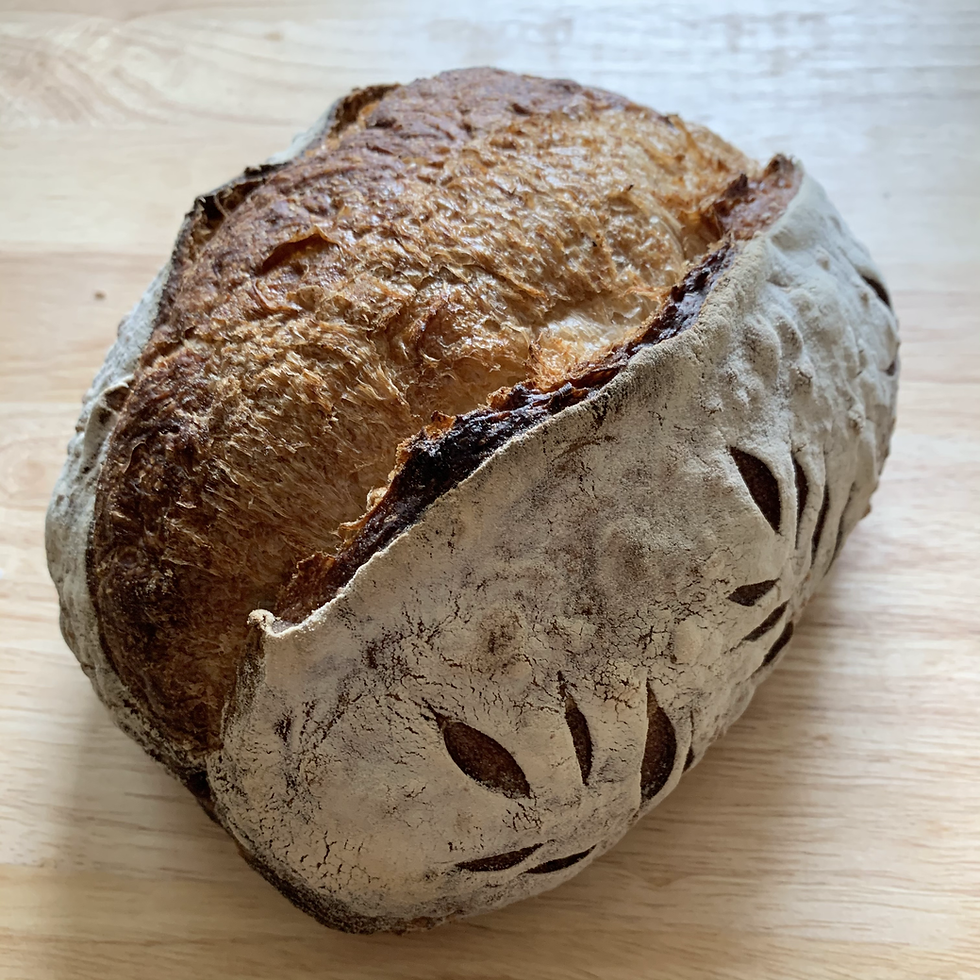
Like I said earlier: two steps forward, one step back. For this bake, I would say not bad but not the best I've made. I would say this has a classic artisanal crumb, with open and somewhat irregular holes. The slightly dense areas along the top, as well as the jagged edges on the crust, are the result of my lackluster scoring. This loaf also had just a hint of an "ear" forming from the steam escaping and crust forming, but not close enough to that classic swoop (it should practically be a purse handle!). It has a light sour flavor and soft, air interior as well. It goes to show the importance of every single step in the bread baking process.
Here is the same formula, the same technique applied to a loaf made a couple of weeks prior. We all have good days and bad days, and so will your bread! Every loaf is unique, and I think that's half the fun.


Throughout my sourdough endeavors, I've taken inspiration from:
Johnson & Wales University Formulas (my culinary school)
King Arthur Baking Company (They also have a great tutorial on how to make your own sourdough starter, define classic baking/bread terms, and other amazing recipes)
Comments